I love Hyper-V inside Windows 11 (and inside Windows 8.x and 10 in their day). An utterly simple hypervisor (to use) but one that provides a lot of benefits. I have written 4, and shortly 5, books that made use of this feature. I have created a nice server farm (2 forests, 3 domains, multiple servers, etc) which runs nicely on my boxes. The scripts to create the VMs, and configure them are all published to GitHub,.
Now to run a VM at a reasonable speed, you need to give the VM resources. My old Precision T7500 did not and could not support the hardware necessary for Win 11. I now have a Precision T7920 with 2 16-core Xeon Gold processors, 128 GB of ram, 1 TB of Nvme SSD, 2x2TB plus 1x1TB SSDs. So a LOT of storage, a LOT of memory, and a lot OF CPU. My farm works great. Except when it doesn't.
I run this box as part of the Windows Insider's program. That means I get a more-or-less weekly upgrade that brings new features and bug fixes. It is a lot of fun - except sometimes the upgrade does NOT work. Over the years I have had numerous issues with an upgrade and have generally been able to back up to an earlier build or take a newer build (with a fix). For the most part this has been an inconvenience to me, but useful for the program for a while - I just love providing feedback.
One specific set of issues caused by an updated Insider build is that Hyper-V does not work. This has happened now around 5 times over the years. NOTE: This was originally written in 2002. Since this blog post was first published, this issue has affected nearly every Windows Insider update I have taken since.
Backing up to an earlier build sometimes cures the problems. But all to often, I just could not get things going again. This happend again a few days ago - and this blog post notes some of the issues and some troubleshooting tips (at that time).
So after an upgrade, starting the Hyper-V MMC showed something like this:
As I hope you can see, the MMC is showing two VMs trying to start. One is stuck at restoring (10%), the other at just restoring. Trying to stop a VM from PowerShell was also not successful.
Troubleshooting tip #1
As long as you have the VHDX(s), you can always rebuild the VM. And if you created the VM with a PowerShell script, re-creating it is trivial.
So with that in mind, I did the obvious thing: I uninstalled Hyper-V totally and rebooted. Then, I "hid" the folders containing my VMs and re-installed Hyper-V. My thinking was that this would clear everything away, and I could unhide the VM folders and re-import the VMs. Except it didn't work/
Having removed then re-added Hyper-V did NOT clear down the configuration. In fact, what I now see is:
So even though I removed and re-added Hyper-V (and hid all the folders containing the VMs/VHDXs) Hyper-V still remembered the old VMs. This seemed illogical until a nice MS person explained it as the de-installation does not take
everything related to Hyper-V off your box - in case you want to reinstall it - your configuration magically reappears.
Troubleshooting tip #2 and #3
A conversation on Twitter led to the discovery. The list of VMs that the MMC uses when it starts up is contained in a file: $env:ProgramData\Microsoft\Windows\Hyper-V\data.vmcx although it was different in earlier versions of Windows.
The second troubleshooting tip: is that it is in binary form, so hand editing is not really possible. I was also told that removing the file totally was a bad idea since it contains other valuable data, too.
So how to recover?
Troubleshooting tip #4
As noted, the details of the VMs and Hyper-V itself are, by default, contained in a folder (with sub-folders) at $env:ProgramData\Microsoft\Windows\Hyper-V. So to get back to a pristine state, remove the Hyper-V feature from Windows 11. After the reboot, remove this folder totally then re-install Hyper-V and reboot. After the reboot, you should see a nice clean MMC console!
With a pristine Hyper-V environment, I have to re-create the virtual switches and then re-create the VMs. It appears that removing the Hyper-V feature deletes all the VM data except the actual VHDXs themselves. So recreating the VMs meant just building a new VM that contained the old VHDX.
There was only one final problem - networking. If you remove a vNIC from a VM, and then add a new NIC, Windows sees the new NIC as, well, a NEW NIC and creates a new configuration for it. But it also keeps the old configuration. This can cause some issues, including not letting you rename the connection inside ncpa.cpl - Windows claims another connection already has that game.
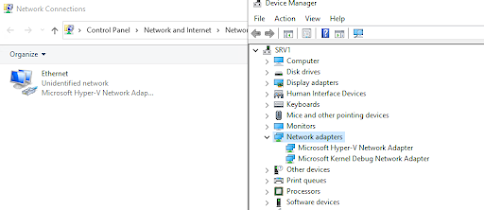
If you open Device Manager, you see just the most recently added vNIC, something like this:
Troubleshooting tip #5
If you enable hidden devices inside Device Manager you can see the "removed" net adapters.
In Device Manager, click on View, then select Show Hidden Devices then you see:
You can then right-click each adapter and uninstall the device. If you then click Action, and then click Scan for hardware changes - you should see just the actual vNICs in your VM.
Troubleshooting tip #6
If you add a 'new' nic to a VM, Windows sees it as a brand new NIC, so sets the device to get its configuration from DHCP.
This might be fine if the host was DHCP configured but not if you configured it with static IP addresses (eg for a DC or a DNS server). Fortunately, you have PowerShell and can easily script the NIC configuration.
I hope this helps someone!
[note: this issue has been with me for a long while. This post was first written in May 2002, but the underlying issue has been consistent since them. I have made some updates (and fixed typos) to this post in May 2023.